I have decided not to build the Dark Star.
When I have trouble making up my mind, I tend to "list & evaluate" the factors that would push me to a decision.
In favor of the Dark Star:
Different
Light weight
Challenging
Small Material Usage
Against the Dark Star:
"Fussy" , unfamiliar building techniques, like the stern mini-deck, fershlugginer Bifurcated Bow, merging strips into the stern section, etc. I would probably get these things right, but I'm not really in the mood to bust my a-- for so-so results.
It looks too small. Considerable of the overall length is the high-rocker bow, which would probably spend much of its time uselessly out of the water.
The high rocker and rounded chine suggest a lousy-tracking, excessively "loose" boat.
Need for sheer clamps.
I also agree with what others before me have said: the forms are too darned far apart. I didn't like the idea of stretching 3/16" strips that far between forms.
A far as decisions go, I sometimes find it useful to evaluate the why. The only reason I'd have to continue the DS would be because I had already gotten as far as I did, building the bow & stern sections, etc, but I already have assembled the box beam, and made strips. I'm not going to build a kayak that I don't want simply because I've started it.
I looked back at Redfish Kayaks "Golden", and it looks appealing-low volume, 16' length, light weight.
Wednesday, October 31, 2018
Sunday, October 28, 2018
The Strongback
I used the same techniques for setting up the forms as the last build,except that I used 1/2" CDX plywood instead of Masonite. It has an advantage in that you can sometimes use the plies to align things, however, the grain running in different directions makes it look "crooked".
 Bow View. The Famous Bow Piece is supported & aligned with an extra mini-bracket. The forms are spaced closer together at the bow & stern.
 Stern view. The stern piece is also supported/aligned with a mini-bracket.
As I go along, I'm beginning to "get" how it all comes together-for example, how the main hull strips run past and rest on the bevels of the stern section. Those extra-thin strips are starting to look mighty frail after tapering.
I still don't understand the whole process, but I'm hoping that after I get closer, that I will.
Monday, October 22, 2018
Starting The Setup
This is going fairly easily. I reassembled two 8' sections of the box beam, leaving about a 1' gap between them, bridged with a scrap of ply. Last year's saw horses went back together o.k.
 Plumbing the upper string. This year's discovery: braided Mason's Line is much easier to use than twisted line. The twisted line never seems to stop trying to unwind itself, but this stuff behaves.

Saturday, October 13, 2018
Buying Cedar & Milling
The weather has turned "autumnal" in a hurry. It seems that I can't get the opportunity to go kayaking to jibe with the weather.
I set out to Ring's End to buy cedar today, despite rain. I got the usual "slightly puzzled" look from the employees as I picked through the stacks. I couldn't find anything that I wanted in the 4/4 lumber, so I resorted to thicker boards, finally finding ones with "the look I want". They are 2x4's with "wild" grain on the top, and straight grain on the edges. I'm going to have to use a different cutting sequence to make strips.
Wednesday, October 3, 2018
Tail Section Saga
This is definitely a "character building" process.
I achieved a compromise between Following The Instructions Implicitly, and Doing It My Way. First, I tried 5/8" x 3/16 strips, but I found it really difficult to bend and twist them enough to lie on the frame without tension, and I had already found that hot melt glue doesn't have any holding power. I went back to the surface planer, and made some strips thinner than 3/16", but not quite down to 1/8" (3/32"?) I found them considerably easier to heat bend. This may make for some thin areas after shaping, but I have been there and done that before.
 I also "resorted" to staples. I know what they do and how to use them. The "cheater" strips were difficult, requiring a compound bend/twist, so I tried full 3/16" thick strips, for more gluing area.
The manual says to strip down about 4-1/2" from the sheer. This is about 4-1/4" from the sheer. I think he means for a larger Baidarka, but this is the smallest one. Its another thing that I won't understand until I get to that stage.
The video also shows the end being joined with a scarf joint, but I think I'm going to go for an end cap lamination instead.
And. of course, the other side was much easier. Somehow, I ended up with three small cheater strips instead of two larger ones, but everything measures out O.K.
I achieved a compromise between Following The Instructions Implicitly, and Doing It My Way. First, I tried 5/8" x 3/16 strips, but I found it really difficult to bend and twist them enough to lie on the frame without tension, and I had already found that hot melt glue doesn't have any holding power. I went back to the surface planer, and made some strips thinner than 3/16", but not quite down to 1/8" (3/32"?) I found them considerably easier to heat bend. This may make for some thin areas after shaping, but I have been there and done that before.

The manual says to strip down about 4-1/2" from the sheer. This is about 4-1/4" from the sheer. I think he means for a larger Baidarka, but this is the smallest one. Its another thing that I won't understand until I get to that stage.
The video also shows the end being joined with a scarf joint, but I think I'm going to go for an end cap lamination instead.
And. of course, the other side was much easier. Somehow, I ended up with three small cheater strips instead of two larger ones, but everything measures out O.K.
Sunday, September 30, 2018
Tracing Forms

It is, as a Great Man once said, "A Pain In The Keister"
I also had tracing paper, but I contact-cement the paper to the wood, and it shows through too much.
I marked the rocker measurement, center line, and sheer line on each form. According to the plan, there are some amazing spaces between forms, like 17". I'm curious to see how that works out with 3/16" thick strips.
Thursday, September 27, 2018
Bow Section
After slogging along and following instructions without really understanding, I came up with this apparatus:
 Only after putting it together did I understand how it works! Hull strips come into the bottom, and deck strips come into the top, which would otherwise be "hanging in space" without them. The purpose and position on the "plug" between the top & bottom sections only became apparent when I actually made it. I got a better understanding of the "musts" and "cants" once I figured it out.
The hot-melt glue joint between the temporary form and form #1 seemed a little wiggly, so I h.m. glued in some blocking. I think I can make the plug look a little more aesthetic by coping and sanding.

The hot-melt glue joint between the temporary form and form #1 seemed a little wiggly, so I h.m. glued in some blocking. I think I can make the plug look a little more aesthetic by coping and sanding.
Tuesday, September 25, 2018
Challenging
I still keep cogitating about this project.
Others have said that "Rob Macks' instructions make more sense once you actually start working". His instructions are actually quite thorough-what he tells you will work, but I'm only obtaining an understanding gradually, as I go along. I'm more used to understanding more before I start, then carrying it out.
For example, the Stern Section. I heeded the advice to think of the first attempt as a practice run, which is good, because it came out lousy. I thought I'd learned enough to go "for good", but I made more errors, and that came out crummy, too. I guess I'm not used to the do-overs.
I'm reminded of my first build, where I tested everything-dry clamping before glue, etc. I wasn't spoiled by thinking that I had enough "know-how" to get things right the first time, so I proceeded very carefully. This time, I'm expecting too much of myself. I need to return to a "beginner mentality".
Sunday, September 16, 2018
Strip Bending For The Tail Section
Rob's advice to view the first attempts to build the bow and stern sections as "practice" is very good. I learned and remembered a great deal about heat bending and hot glue:
1. You have to over-bend all strips much more than it looks like you have to. Even after cooling, they "neck back" and try to straighten themselves.
2. Hot melt glue will not hold a strip down that isn't bent enough to lie against the form naturally, without force. Neither would a staple or a brad.
3. In the past, I haven't really "obeyed" the forms completely-some strips pulled off the forms, and it was acceptable. I won't get away with that here 😏
4. I am certainly going to have to bevel the strips as always.
Looking at my Workmate gave me an idea:
 I shift the C clamps around until I get the desired bend. It holds the work nicely, unlike clamping one end and holding the other. I can really hit it with the heat gun without burning myself.
1. You have to over-bend all strips much more than it looks like you have to. Even after cooling, they "neck back" and try to straighten themselves.
2. Hot melt glue will not hold a strip down that isn't bent enough to lie against the form naturally, without force. Neither would a staple or a brad.
3. In the past, I haven't really "obeyed" the forms completely-some strips pulled off the forms, and it was acceptable. I won't get away with that here 😏
4. I am certainly going to have to bevel the strips as always.
Looking at my Workmate gave me an idea:

Saturday, September 15, 2018
O.K, I'm Actually Building It
Incrementally and gradually, I got more used to the plans, after reading the manual and watching the video. I finally decided to go through with it. It was also helpful to find Etienne's webpage about building one of these, since he is a builder who isn't afraid to deviate from a design.
Tracing forms from the originals is a pain, but I nevertheless did it, and a morning's work resulted in this apparatus:
 As "everyone" says, Rob's instructions make more sense when you actually put your hands on the work. The half forms and the tapering remind me of the bow form of a Greenland kayak. I actually used hot-melt glue, and the 1/2" plywood called for. I'm glad that I used the plywood, because the plies help show tapering.
Tracing forms from the originals is a pain, but I nevertheless did it, and a morning's work resulted in this apparatus:

Thursday, September 6, 2018
New Ideas
I had, after my last build was completed, decided not to build another kayak this winter, however, I managed to find excuses to do just that.
After messing around with Kayak Foundry quite a bit, I got better at using KF, but not much better at designing a kayak. I seem to keep going back to a shape that looks much like the last one, and there is still a disconnect between the technical numbers, aesthetics, and the message board comments. I decided to put that project on hold. I don't want to put another whole winter's effort into a possibly flawed design.
I started looking for published designs, but didn't really find any, until I started looking at Rob Macks' "Dark Star" baidarka. I had previously shied away from those things, because they looked like a lot of trouble to build, but I came up with reasons to try it:
1. It will be 15' 6" long\
2. I can probably build it ultra-light.
3. Its something besides the S.O.S.
I checked out the paddler weight requirements, and weighed myself with gear: 167. The upper limit for the design is 180. I don't want to build another boat bigger than necessary, and now I may be able to achieve my years-old goal of building a "grab-and-go" kayak.
I ordered his plans and video: $172
9-9
When I got the plans, I was pissed!
He doesn't have full-sized forms. There is what appears to be a picture of forms stacked up (the view that everyone seems fascinated with), with markings to use on tracing paper! No waterline marks. No rocker measurement printed on the forms, you have to look at the full-boat diagram. The video is slightly helpful, because his written instructions are notoriously hard to understand.
I felt like returning them, but as I get used to the differences, I'm now thinking that I'll probably go through with it.
9-11
I still keep getting pissed off, the more I read the manual. It isn't very good for the experienced builder, who wants to know the basic principles and differences between building the baidarka and building a Greenland kayak. Its very step-by-step, but his way.
Monday, July 23, 2018
Rubstrips
I had used the fancy KeelEasy strips, with high hopes, but they were a disappointment. They promptly started falling off.
A few builds ago, I ordered CLC's kit for building rubstrips with Dynel fabric and graphite powder, but didn't use it. I still had the graphite powder, found Dynel locally, and decided to improvise.
 I epoxied in two layers of the Dynel fabric. Odd stuff this is-seems almost like cotton.
 After cure, I mixed epoxy, graphite,and a little wood flour. I found that if I tried to thicken the epoxy with just the graphite, it "never" thickened. I hope the electrical tape masking leaves a sharp line.
Scraped & sanded the first coat, and painted on a second. This stuff is hard to cut, which is probably a good sign.
Its also hard to sand. Electrical tape wasn't a good choice for masking, and I had a hard time pulling it out to leave a clean line.
 Finished. Sanding was difficult, because the dust was loaded with graphite powder which got "everywhere". I also had to sand, re-epoxy and re-varnish the hull areas around the strips.
In all, the tape strips looked better, but these are permanent.
A few builds ago, I ordered CLC's kit for building rubstrips with Dynel fabric and graphite powder, but didn't use it. I still had the graphite powder, found Dynel locally, and decided to improvise.


Scraped & sanded the first coat, and painted on a second. This stuff is hard to cut, which is probably a good sign.
Its also hard to sand. Electrical tape wasn't a good choice for masking, and I had a hard time pulling it out to leave a clean line.

In all, the tape strips looked better, but these are permanent.
Friday, May 4, 2018
Outfitting
Normally the most rewarding & fun part of the build, but I had to exercise patience this time. Just when it seemed like I wasn't making any progress, poof! -I was done!
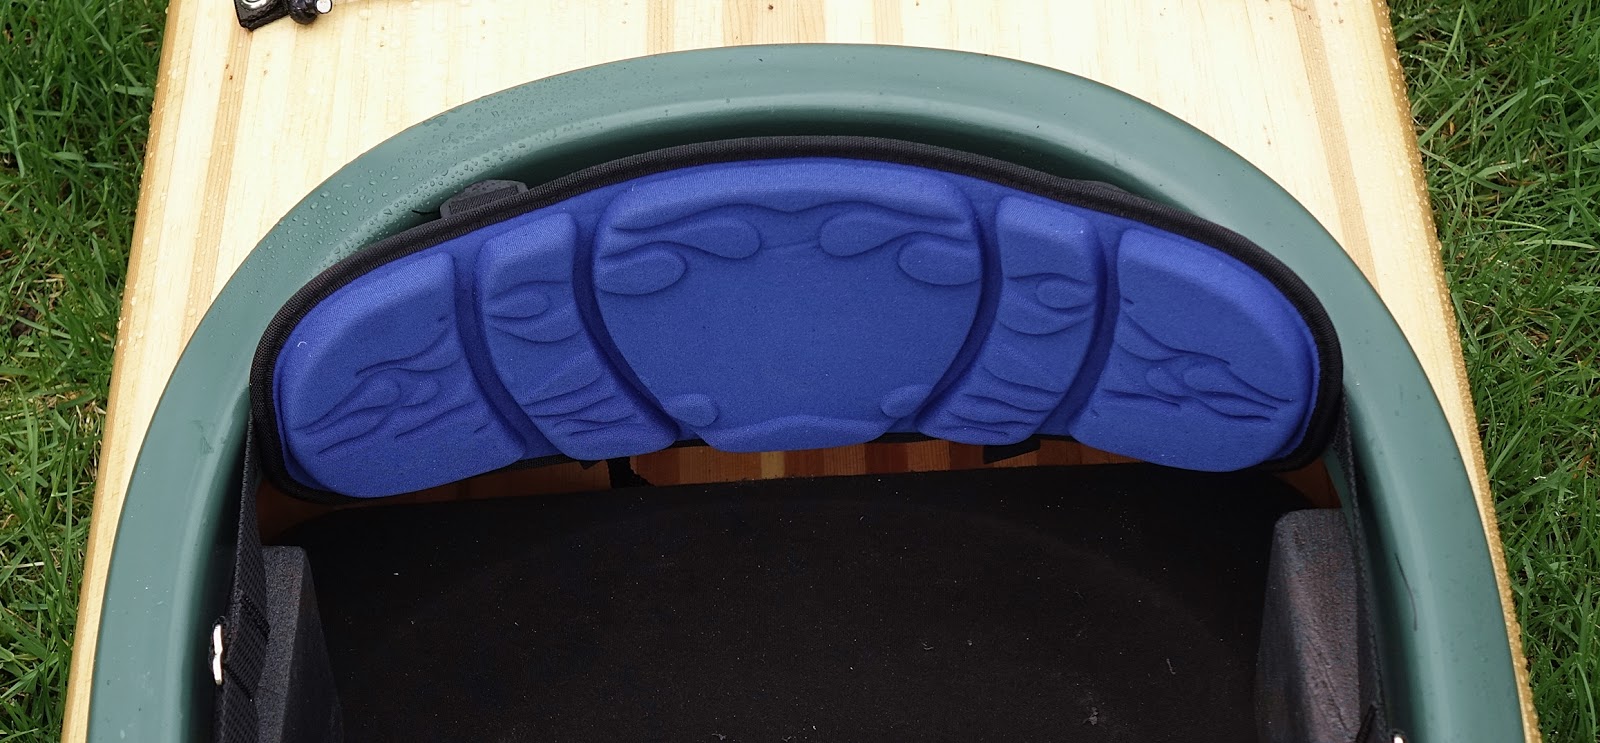
 I tried a new system for the side braces. Instead of gluing in hip plates, I am using foam blocks. I made the seat wider than usual, contoured the foam blocks to fit the kayak, and glued the blocks in a position which (I hope) will hold the seat in place. That gets me out of struggling with velcro strips on the seat and cockpit.
 The usual backband.
 The usual aft deck rigging and hatch toggles. One thing: I tried to locate the holes for the toggles to totally miss the hatch spacer on the inside, but less of the toggle holds down the hatch. I'm going to add two more toggles to the fore and aft edges of the hatches.
 I went for a simple knotted grab loop, no handle.
I mounted the GPS holder on the foredeck, as on the Outer Island.


I mounted the GPS holder on the foredeck, as on the Outer Island.
Thursday, April 19, 2018
Varnishing
Finally managed to get both kayaks sanded, and the basement clean enough for varnishing. My work schedule and the weather were not cooperative.
I had forgotten how much room two kayaks take up in the basement. The Outer Island looks huge next to the new one!
I'm using Epiphanes varnish with their own thinner. Much less stinky than the Interlux and 333 thinner-I can barely smell anything from upstairs.
I'm trying a new system for applying the coats. I masked a line on the sheerlines with frogtape, and I'm going to apply all coats to the bottoms, flip the boats over, mask again, and apply all coats to the decks.
The masking system seems to work pretty well. I'm surprised at how actually thick the varnish coats are, and that when I remove the tape, there is a distinct line that I can feel. At least its a straight, sharp line. I also continue to get the hang of varnishing-this stuff tends to level itself out more than I thought, and I had been too stingy with the coats in the past.
Friday, April 13, 2018
It Sees The Light Of Day
Winter is determined to hang on this year. Today was the first 60-degree day, so I decided to "go for it", and do some Wet & Dirty Work.
I hauled the Outer Island out of the alley and into the basement, to touch up and complete the skeg repair. It really got through the winter very well, and I'd almost forgotten how pretty it is. I had also forgotten that I had removed the cockpit side brace pads, so now I'll have a chance to redo them.
 I hauled the new 'yak outside, and wet-sanded with #320 and #500 paper.
 I got some Keel Easy strips, mainly to hide a few minor woodworking glitches. I had considered using them on the O. I. too, but it doesn't seem necessary.
I hauled the Outer Island out of the alley and into the basement, to touch up and complete the skeg repair. It really got through the winter very well, and I'd almost forgotten how pretty it is. I had also forgotten that I had removed the cockpit side brace pads, so now I'll have a chance to redo them.


Friday, March 30, 2018
Cockpit Coaming
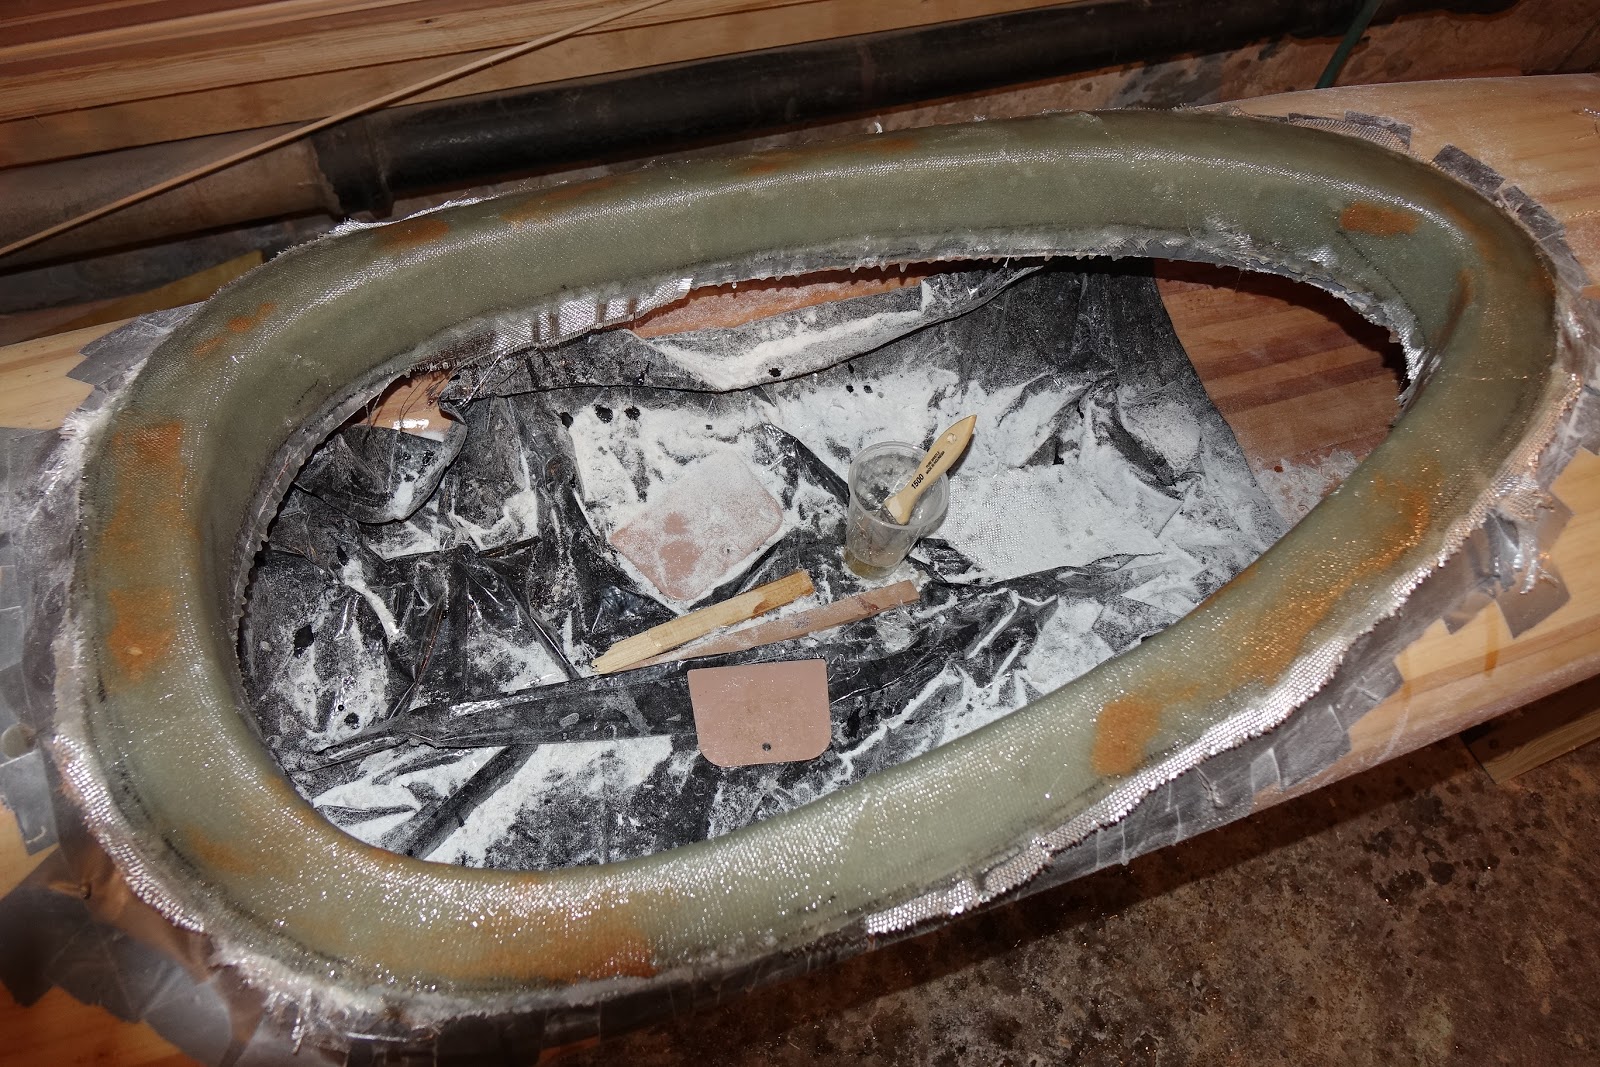
I went for another laid-up fiberglass rim, enough time having passed for me to forget how tedious it is.
 I had no appropriate minicel foam, so I ended up using a piece of foam insulation. I'm trying to remember how it seems like you have built up more thickness than you actually have, so I'm on the third yard of 10 oz. glass. The brown splotches are where I'm trying to fill low spots with dookie.
I tried HAWK brand epoxy from Defender. It's cheap, but doesn't seem like great stuff.
I ran out of MAS resin before I ran out of MAS hardener, so I'm trying to use the MAS hardener with the leftover RAKA resin. People on the message board, say not to do it, but it seems to cure up just fine. In any case, I'm using this combo on parts that can be repaired if necessary.
 I thought I had gone a little thin the last time I made one of these, so I really laid the plies on this time. When I got to removing the rim from the mold, it looked to be almost 1/4" thick! I wanted a thicker rim this time, so the edge would be rounded off more, for easier removal of the spray skirt. After trimming, it weighs a whopping three pounds !
 Sanded and painted. I hope the trimming and sanding saved a little weight. :)
I tried HAWK brand epoxy from Defender. It's cheap, but doesn't seem like great stuff.
I ran out of MAS resin before I ran out of MAS hardener, so I'm trying to use the MAS hardener with the leftover RAKA resin. People on the message board, say not to do it, but it seems to cure up just fine. In any case, I'm using this combo on parts that can be repaired if necessary.


Tuesday, March 20, 2018
Bulkheads
These went routinely, but I did an experiment and made a discovery. I made a foam bulkhead and a 1/8" plywood bulkhead with the same form as a template, and weighed them. The plywood bulkhead was actually lighter than the 3" minicel!


Sunday, March 4, 2018
Exterior Hull Work

The skeg box opened up with the router. I glassed around the edges with 2 oz. cloth.
While sanding, I noticed that not only did I hit the 'glass n a few spots, but I actually went through the glass to the bare wood! I'm trying little patches of saturated 2 oz. glass and two coats of epoxy as a remedy.
 It seems to be working.
Saturday, February 17, 2018
Interior Hull Work
The usual grinding away with the disc sander, except this time, I decided not to go too crazy smoothing the parts that won't be seen. Fiberglassing went well enough.
 The skeg box in place. I made it before starting the build. This time I used 5mm okume ply instead of shop birch, and stuck a piece of plywood in the slot to help it hold its shape. I was careful to saturate the bare plywood with clear epoxy before gluing it down. I hope this one holds up better than the last one!

Thursday, February 8, 2018
Completing The Deck

This is also where I really got to see my design. The deck is flatter than I had envisioned, and there are two fairly prominent humps forward of the cockpit. It also looks shorter & wider than I thought it would be.
All part of The Learning Curve.
I faired it (basically) and took it off. Relatively heavy, with all that pine.
Subscribe to:
Posts (Atom)