Wednesday, May 1, 2013
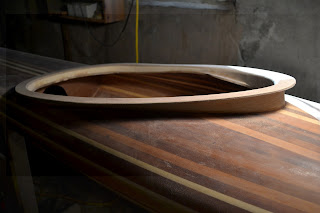
Cockpit Coaming & Riser
I had a feeling that I'd make myself a lot of work by raising the foredeck, and I sure did.
On my previous builds, I raised the coaming by stacking up rings of plywood. after raising the foredeck 1", there was nearly a 2" difference in height between the front & back, when a straightedge is placed across the opening. I posted on the message board, and of course got plenty of suggestions. I decided to go for the Lots Of Tiny Pieces method.
I put coves & beads on some leftover pine strips. Somehow, this was easier than the last time I tried it. It must have been the router table setup.
I glued the pieces together with hot-melt glue. I'm kind of working backwards here: most make a very neat cockpit opening, then build the riser around it. I made a very neat lip ring, and I'm building the riser around it.
Second row, glued to the first. Already scrounging for clamps.
I thought the setup might look ugly, so I made a strip of white oak to go around the outside. Tried steam-bending it (disaster), but managed to laminate it on with the heat gun & epoxy.
Coping the bottom to fit the deck was very tedious. I discovered that one side of the opening was higher than the other, and had to use major clamp pressure to get it level. I made a fillet of dookie around the outside.
Showing the height difference. I couldn't see building it up with 8 plywood rings, or 20 layers of fiberglass cloth!
Fiberglassed, by the usual technique, and the usual sanding. Very pleased that my old spray skirt fits.
Subscribe to:
Post Comments (Atom)


No comments:
Post a Comment