Monday, December 21, 2020

Cheaters and The Waterline


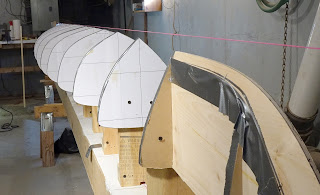
 I did the usual technique of running a full strip out from the sheer and filling in with cheaters. Again, the 1/2" accent strips seemed more sturdy. At the areas of forms 1 and 16, I found that the shim wasn't actually necessary-I just made sure that the strips went in with a fair line.


At the bow, only two cheaters were required.


The the first strip that fills the gap between the accent strips was a little "fancy", requiring planing to make it fit in between for about 1/3 of its length. I decided to try making the scarf joint in situ instead of ahead of time.  I was able to place the strip in two sections.

Where the strip nearly filled the gap, I simply removed the nail in the accent strip, and clamped together. I only had to move the accent strip about 1 mm.

Filling in to the waterline went well. I've gotten a little better at tapering the strips so that they fit to the end, with little need for filler.

Monday, December 7, 2020

Starting To Strip

I decided to make the sheer & waterline strips a full 1/2" wide this time. The bow & stern aren't as curved in this design, and I had no problem bending the bigger strips.


 They fell into place on the lines pretty easily. In fact, it seemed easier to get a fair curve with the bigger strips. I only had to make two adjustments, and didn't have to move any of the forms.
Similarly, the  1/2" keel strip seemed easier to get straight.


A bit of a "situation" appeared at forms 1 and 17. If I ran the strip from the next form, there was a big dip to the form. That's probably where I made the bow & stern entries a little too fine on Kayak Foundry. These forms didn't look right all along-they may be placed wrong. I put a 6d nail through the strip. The strip can be slid back & forth on the nail to meet the neighboring strips, for a fair line. 


Saturday, November 21, 2020

Setting Up

 After getting all the forms trimmed, I decided to set up to the waterline level, as in last years' build. Much to my surprise, form 6 had the least distance between waterline & keel! I had assumed that it would be the biggest form, form nine. Puzzled, I went back to Kayak Foundry, zoomed in, and sure enough, that's how t is. The keel slopes back down to forms 7 and 8, then curves up to the stern. 


Additionally, I discovered that I had placed forms 1 and 16 incorrectly on the bow & stern forms. O. K, that's enough "false starts"!

Hmm, maybe not. 😉 I set up the box beam and alignment strings, then looked for the form with the least distance between keel & waterline, to use as a gauge. I found that several of the forms were very close in that measurement, and actually had difficulty picking one. That brought me to the conclusion that this design does not have enough rocker. It was mentioned on the Kayak Foundry message board. 
So, "back to the drawing board", as in Kayak Foundry. I dropped the keel down a few clicks to add rocker. I reprinted the forms (this time, giving Staples' copier a pass), and remade them on 1/2" MDF, being tired of the bulk of the 3/4" stuff. I seem to recall using 1/2" material in the past.
It seems that I didn't add much rocker- several forms in the center had almost no drop from the string, which caused the quandary mentioned above. I set up to the waterline.

Showing how flat it is in the middle. Almost no rocker until form #5.


At the stern, very little rocker until form # 15.

So, I accomplished my goal of designing a kayak with low rocker and a long waterline. I wont know how it handles until I paddle it.

Friday, November 20, 2020

Starting

I printed the forms routinely, lots of paper and tape, as with my last Kayak Foundry build. I thought it might be easier to work with copies, so I went to Staples. I paid $20 for slow, mediocre service. It was easier to work with the copies, but after all the forms were glued to Masonite & trimmed, I found that form #2 and the Bow Form misaligned by over 1/4"! I began to suspect that Staples' copier was off, but after careful measurement, I determined that the copies were O.K. I finally realized that I know how to finagle, shim, and adjust forms during the build, so I trimmed the Deck Side of the bow form & went with it. If necessary, it wouldn't be the the first time that I had to make adjustments on the fly.

I have two superstitions about starting a build. On every good build, I have managed to hurt myself a little (things on the order of stapling my finger, dropping something on my foot, etc.) and made a false start on some phase of the project. This time. I stuck my finger with a measuring gauge, and had the quandary about the forms. I also had to re-make forms 1 and 2. 😉


Saturday, October 17, 2020

A New Build

 I had been thinking, for a long time, of building a kayak intended for sale only. Instead, I built the SLT. Now I finally have the two kayaks I want to use: The Big One, for more "serious" conditions, and The Small, "grab & go" one for short trips, groups, etc. 


Kayak Foundry. My intention was to design a flatwater-cruising boat, with a long waterline and low rocker. I'm still somewhat "locked into" the KF "rules", but I'm trying to be slightly more intuitive. 

I posted a message on Facebook's Kayak Building page, asking the simple question of  "How much should I ask for a new, hand-built kayak?" I got the usual string of Message Board Responses, with many putting their own interpretation on the question, and a few helpful responses. Some seemed to read the question as "how to I make a fortune selling kayaks?", "how do I make a living selling kayaks?", or "is it worth it for me to sell a kayak?". Nick linked to an article on his website which is seemingly designed to discourage anyone else from trying to sell kayaks, and in about the next  breath encouraged another guy to try raising his prices! I don't know as if anyone actually gave me a plausible $.

The wooden kayaks on EBay are priced around $4000. I'm watching the listings to see if they actually sell. 

I'm going to build it. I's going to be a little stressful, having to pay much attention to detail.

11-14

I also asked the folks on Kayak Foundry what they thought, and got very technical answers, including a very thorough article by N. Schade about Stability. It answered my question of what creates the "catch" of Secondary Stability. I guess it depends on who you ask-Jay Babina (artist): "Anything goes! Have fun!" Rob Macks (craftsman): "Kayak Foundry is a program adapted from a program designed for larger boats! You can't use those numbers on kayaks!" Nick Schade (engineer): Two page article with charts and math.

In the end, I decide on something and do it, both in building and and trying to sell it.


Friday, October 2, 2020

Flat Hammock Island

I have been looking at a paddle to Fisher's Island for a long time.  I always chickened out because of wind, waves, boat activity, etc. Today, I decided to compromise & go for Flat Hammock, then on to Fisher's if I felt like it.

Mostly cloudy, 60-degree morning. Set out at 7:30, before the wind came up, on the incoming tide. Mostly glassy-smooth, with the "swell" I've heard tell of, up to Seaflower Reef, where I met some "confused waters on an agenda"-nothing to lose control over, but that's what put me off the last time. It occurs to me that the waters were "confused" because it is a reef.

North Dumpling Island. This photo was actually taken on the way back, but I did slow down to check it out on the way in. Interesting up close, neatly maintained, model of Stonehenge, grove of groomed conifers, "Off Limits" signs.


So, here we are on the Flat Hammock. Not exactly as I envisioned it from the map-smaller, and the beach is pebble, not sand. I was a bit worried by the presence of birds, but they were non-aggressive.


 A cable, of unknown function and destination.


Concrete Thing. It had a window on the other side.

Having set out from Bayberry Lane, my GPS showed almost four miles. It would definitely have been shorter to depart from Esker Point. Although Fishers looked close enough to hit with an arrow, I didn't want to push myself too much, so I headed back.


South Dumpling. This is supposed to be the Island Of Angry Birds, so I let it be.

It must be "off the grid" with the windmill and all those solar panels. More buildings than I thought. I Think the gray house is where people actually live. There was also a sizeable power boat moored a few yards offshore.

My strategy of an early start did help me avoid the winds on the way out, but predictably, I faced a headwind on the way back. Oddly, I made better time with the headwind than without? Maybe the tide was helping.


Interesting Sky. I'm glad I made it back before the weather got too "interesting" 😏
Maybe next time I'll leave from Esker Point, when the weather is actually warm.


Friday, August 28, 2020

Rose Island

 I haven't posted a blog about a paddle in a while. so here I go.

Rose Island is another of the many islands around Newport, R.I. The last post I wrote about an island around here was Dutch Island, and it turned out that my exploration of that place was illegal!  I checked this one out a little better, and it looked interesting.

Put in at Jamestown's Freebody  Drive. A nice area with a calm gray sand beach. Paddled under The Newport bridge, to a pier in Newport. Pretty nice conditions, albeit a bit bouncy.

Passed this lonesome little island, which try as I may, I  can't find the name of! It must have historic/patriotic significance.


I wanted a shot where the bridge piers dwindled to "infinity", but I couldn't the the angle right.

Found a gravel beach on Rose Island. The Newport Bridge demands its picture taken:

The lighthouse. Met an old guy who "informed" me that the island was closed, and I wasn't supposed to have beached my boat, but I could take a quick walk around. Gee, thanks. Generally, when people start spouting rules, should they at least give themselves some identification, an some in charge of dispensing rules?


I like lichen


The cool stuff I saw on the map is of course. closed off.

These looked like barracks, but I think you can rent a room here:
In this area, I also saw a Sign With Rules. You can beach a boat where I did, and the island is open for walking around after August 15. Maybe that guy was the Custodian Of Special Lockdown Rules.

Thursday, April 2, 2020

Complete

...on the absurdly early date of 4/2.
Now what am I going to do on "furlough? 😖
Weather is Early Spring-40's when cloudy, 50's when sunny. I know I won't be able to wait long before trying it out.
4/6....and so I couldn't! Waited 2 excruciatingly for two cold, cloudy days until today, when the sun came out, and it was near 60 degrees. Tried it at my Favorite Tryout Lake. Got a decent fit in the cockpit, after some adjustments. On the water, it seemed slow, but I had to keep reminding myself that I was mentally comparing it to the speedy Outer Island. Stability and tracking are good. I want to see how it acts in waves. 
6/8
After using it in a variety of conditions, I like it better than at first. The O.I. is faster at top speed-this boat seems to glide more easily at low speed. Predictably, a little more "bouncy" in waves.

Tuesday, March 31, 2020

Outfitting

Due to the "furlough", I'm already outfitting the kayak, and it isn't even April yet.
It occurred to me today, that I am much too used to doing things "fast", and that I now have plenty of time for details and do-overs.
I decided to actually do the drill/fill/re-drill thing on the holes in the deck. In the past, I had drilled the holes to size, epoxied the hole, and put the bolt through. On the Outer Island, I can see dark spots where water penetrated the wood. This time, I actually drilled the hole oversize, filled the  hole with epoxy, and drilled to size. When I drilled, I got only epoxy chips, so I'm thinking that it works better this way.
I decided that hatch the rim needs more sanding, and another coat of paint.
Skeg control. I had almost forgotten how tedious it is to put this together. I neglected to prevent epoxy & varnish from going into the holes, so spent quite a while reaming them out. Something didn't quite jibe regarding the length of the inner tube, and the travel of the cable necessary  to make the skeg go up & down-the inner tube popped out of the outer tube when the skeg was all the way down. I think it may be because this skeg is smaller than the design size. The little black gizmo on the right stops the knob from going down all the way and pulling the inner tube out. All this makes much more sense in practice than in print 😀
I decided on a new way of doing the deck rigging, besides the usual criss-cross pattern. I figured that all I really use the rigging for is to hold my wet bag & pump, and these will do the job. I got the through-deck plugs online. The bungee cord is simply knotted under the deck.
The backband was saved from the kayak that I donated to charity two years ago. I also saved the seat,  which with an adjustment to the width, worked out fine. The side braces seemed to have come out angled inward a little, which seems strange since I leveled the kayak and plumbed the braces. Made some fancy angle cuts on the table saw.

Monday, March 23, 2020

Varnishing In Winter

Work is progressing very fast. My workplace is closed due to the coronavirus, and I'm shut in.
I've never been as far as varnishing in the month of March. And wouldn't you know, the mild weather ended today, it was 35 degrees and snowing. My hygrometer in the basement read 44%, so I went ahead for a first coat. Seems to have gone adequately well.
Another almost accidental "revelation"- Epiphanes varnish and thinner barely smell! In the past, I had been using Interlux varnish with their 333 thinner, and it made a mighty/scary/toxic stench. I made a coat, then fled the house for the day. I just made a coating with the Epiphanes a few hours ago, and can't smell a thing. 
The Hygrometer never went over 55%, so I went on with all coats. Varnishing is a P.I.T.A. no matter how well or badly I do it.😏

Friday, March 20, 2020

Sanding Outdoors

...On the ridiculously early date of March 20. I have no idea why the work is proceeding so quickly.
A chance to see the two kayaks side by side shows that the SLT is indeed "little", but mainly in length, not volume. This messy job went fairly quickly. 

Tuesday, March 17, 2020

Details

The skeg control box and footbrace kit went routinely, no photos necessary. Trying to figure out a really good way to paint the cockpit rim.
Normally, I don't like to digress much from the topics of building/using kayaks, but things have gone Somewhat Crazy due to the Coronavirus. My workplace is shut down for two weeks. As everyone is encouraged to stay home, I'm glad that I have a stay-at-home project to occupy me. However, I need to learn to stop multitasking and budgeting time! 😉

Tuesday, March 3, 2020

Bulkheads

I used junky 1/8" plywood from the lumber store. It was painted on one side, and I glassed both sides with 2 oz. Having no luck in using any station form for a template, I resorted to the plumbing solder technique. The seemed to go in crooked-I think that they were  too flexible. I seem to remember using 1/4" ply in the past. Maybe I'll give foam another try next time.

Thursday, February 27, 2020

Cockpit Rim

I had originally planned on a molded fiberglass rim, but could not find plywood as flexible as the junk stuff they gave me at the lumber store years ago. I thought of a few options, then decided to fall back on a laminated plywood riser.
This seemed easier than I remember. I did have to waste a lot of plywood, so I used ultra-garbage underlayment.
The rim glued to the risers. The assembly still isn't glued down to the deck.
In place and painted.

Thursday, February 20, 2020

Hatches

I decided not to use the hatch templates I've been using "forever", and go for something different-ovals. I couldn't find anything handy to use for a template, so I went online and learned how to mark out an oval using the compass. It was a neat thing, made me feel like a smart child.
It provided this groovy-looking template.
I made the spacers & lips in the usual way. These openings are going to be a little smaller than usual, almost for "show".
It all went fairly smoothly. I used fairing filler and painted.

Sunday, February 9, 2020

Deck Work

Sanding the deck went fairly routinely. I decided not to go to extraordinary levels of perfection.
This guy is an onlay, not an inlay. I never seemed to get the "excavation" right when I've done inlays, so I went for this method. I'm hoping that everything will saturate all right.
I still had a few problems where the hull stuck out further than the deck, and I couldn't squeeze it in. I sanded it down right through to the bare wood in a few spots, but these will be covered by the deck overlap.
Glassing the deck went well enough. I stuck to my new "heavier coats" approach with some success, and didn't hit the glass much. As expected, the area of the onlay  needed multiple coats to even it out.

Saturday, February 1, 2020

Joining Deck And Hull

I "got over" cringing about drilling holes in the hull, and put several more pull-together sticks in. I also tried pulling a double-sided piece of sandpaper between the halves, to attempt to align the joint.
This time, I put a full coating of thickened epoxy on both halves, instead of spot-gluing.
Quite a barrage of clamps, straps, tape, and shrink wrap holding it in place. The tension sticks made it easy to align the deck and hull. I fervently hope it holds once I remove all this stuff!
The kayak looks bigger than I thought it would. Vaclav's designs do.
Huzzah! I removed all the apparatus holding it together, and nothing moved or distorted!
I did try putting in the strips of 4 oz. tape, and it just wouldn't happen. The strips are hard to make in the first place, and they wouldn't unravel without going "out of control".
I "resorted" to fiberglass tape. I got (ridiculously cheap) 1-1/2" tape, and did the seams without problems. I think it was the 2" stuff that seemed to drink up mass quantities of epoxy.
All this makes me want to try a design that uses sheer clamps.

Friday, January 24, 2020

Fixing Hull "Issues"

I think I figured out why the hull expanded:
1. Weather. There were big fluctuations in temperature/humidity when I was ready to glass the hull. I was too intent on Getting It Done, and didn't notice the expansion.
2. Short kayak, lots of small strips, and new-to-me wood. I think that the low-density pawlonia absorbs/desorbs moisture quickly. The ease of heat-bending is a clue.
3. Timing. I'll have to, in the future, find a way to put the halves together while everything is still fair. I may try glassing the hull exterior first in the future.
I went on that Favorite Message Board for suggestions, and as expected, plenty of response. This is one of the suggestions:
Ratchet straps and blocks of wood pulling the hull back into the forms. Fortunately inexpensive, $10/4. Very glad to see that when the gunwale is pulled in, the hull conforms almost perfectly to the shape of the forms.
Of course, now that both sides are glassed, the wood won't react to temperature/humidity changes, but I hope that the whole thing "takes a set" while the epoxy continues to cure for a while.
Nope. 😒 I left the above arrangement in place while I glassed the deck underside. When I removed the forms, the hull sprang right back out to its original shape.
I tried getting the deck to fit by using the straps and blocks of wood, but the hull was very much wider than the deck, and the deck kept diving down into the hull. On to Plan B:
I put the forms back in with the straps holding them in place as in the above photo. I made these sticks of lumber to pull the hull back into the forms. After I got over cringing about drilling holes through the hull, I did several of these. I'm hoping that they will hold the hull in shape enough to be able to work with the straps & blocks.

Friday, January 17, 2020

Glassing The Hull

As usual, sanding the hull was more work than expected, and every flaw is staring at me. 😉
Interesting: I did set the hull up with several forms hot-melt glued in place. They fit snugly. While sanding, they had a tendency to fall out, and today I noticed that they don't fit snugly any more-the gunwales have expanded back out to where they were before I glassed the interior. The epoxy shrinkage is temporary? I'm interested in seeing if the hull shrinks back to the forms after glassing. The hull now sticks out as much as 1" from the forms, and that will make the fit "challenging".
After setting the glass in place, I only needed to cut one small dart in the end of the stern. I decided on two 3' x 2" reinforcing strips at the bow & stern.
The strip in place. I find it easier to place the strip on the wet epoxy, after the main sheath of glass is saturated, than to try & saturate the  two layers at once.
After the first fill coat, I noticed that the hull is definitely not  shrinking back to the forms-on the contrary, it spread out. On my favorite message board, one guy suggested that it was more about the wood being affected by temperature and humidity than about epoxy shrinkage. It's going to take some "serious doing" to fix this. Come to think of it, this is the same problem that I had last year. Maybe 3/16" strips aren't really a good idea?
Almost ironically, this is the best epoxy coating I've ever done on a hull. I went for a thicker fill coat, and the weave is mostly filled after the first coat.

Saturday, January 4, 2020

Hull Interior Work

 After removing the deck, once again, the Bow and Stern forms wouldn't come off the hull-just like the last time I built a strongback without internal stems. Again, I had to "get medieval" to remove them. Oddly, I didn't really find any spots where the forms & hull were glued together badly, but I guess it doesn't take much. The wood glue on the duct tape seems to stick just enough to make it difficult.
I filleted the ends. In the past. I had left these wet, and put the fiberglass on the wet putty. This time, I'm going to let them dry, sand, and possibly use some more before fiberglassing.
I did sand the fillet basically, and skim on another coating of dookie. I placed form #3 back in the hull, by way of experiment to see if I can use the forms on wet fiberglass to prevent shrinkage. Form #5 is in the dry area.
I decide not to go "nuts" fairing the interior of the hull this time. If the glue residue is so tough, and so resistant to everything, some of it can stay in.
After 'glassing the interior, I placed three forms in the hull, and noticed that the sheer of the hull was actually wider  than the forms. The forms are (supposed to be) there to prevent the hull from shrinking too narrow, but there was a gap between the forms and the hull. I decided to tape them together & see what happens. This might have been the problem last year.
The usual end caps. I kept them as small as possible.
The skeg box in place. This turned out to be a bit of a finagle, because the center strip is covered in dookie, and I couldn't see it for alignment. I got around it by marking the center with two small holes. 
I'm also trying to pull the gunwales together with tape while the epoxy (supposedly?) shrinks. I placed a few forms in the hull, pulled the hull to them, and placed tape across the boat. I'm going to try this with hot-melt glue when I 'glass the hull exterior.
Interesting. After the third coat of epoxy cured overnight, the pieces of tape that were tight  became  slack. It seems that the epoxy takes a day or three to shrink. I'm definitely putting several forms in the hull while I 'glass the exterior.