Instead of a new kayak this winter, I thought I would take a shot at re-fiberglassing the old O.I.
Started with the hatches, thinking that they could be replaced if it was a disaster. It seemed to be a disaster unfolding as I started working with the heat gun. Glue joints cracked, and the smaller hatch wanted to "reshape" itself.
However, after more sanding, it looked pretty nice. A lot of "patina" came off, and I remember the wood looking like this originally. Now I "have to" do the whole boat, so they won't look out of place 😉
Unfortunately, I didn't anticipate that they would curl inward, now that bare wood was exposed!
I fixed this, laboriously, with contoured pieces of wood to counteract the curl:They came back to almost the original shape. I was preparing to make new hatch covers of pawlonia wood, but decided to try and save the originals, for a better match.
I also decided, as part of the job, to remove the old skeg control box. It came out easily using the heat gun.
Process of stripping. Still getting the hang of how much heat to use for how long, etc. Sometimes, big pieces come off with the epoxy and a little bit of wood, but grain tears out. The wood aged to the "patina" unevenly, and the wood looks more uniform when sanded down to its original color. I was pleased to see that little spots discolored by water damage sanded out easily. I settled on the technique of heating the work until the fiberglass pulled away from the epoxy, to avoid any more grain tearing out. I then had to go back, heat the epoxy, and use a putty knife & cabinet scraper. It occurred to me that I had put the 'glass on to stay years ago 😉
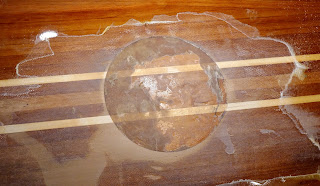
My Osprey inlay didn't survive the process. At first, it seemed as if I might be able to just get the glass & epoxy off, then sand, but chunks of the inlay started coming out. Plan B to follow.
This hatch lip also deteriorated as the rear hatch lip did a couple of years ago. These parts take a lot of exposure, as the gap between the hatch & deck usually fills with water. After removing the rotten pieces, I also discovered that the amount of putty that I used to glue in the spacer was inadequate, only forming a ridge about 1/2" wide. The rest of the spacer was apparently hanging out, unprotected, which is probably how the water got in.
Overzealous use of the heat gun caused the deck and hull to separate at this spot. The interior fiberglass strip must have been attached weakly. I reinforced the interior with a new strip, and noticed that the problem was probably caused by a difference in thickness between the two parts. Hopefully, I got everything coated well enough.
Sanding down to the bare wood is fairly tedious. Fairing board, longboard, etc. The area under the cockpit rim is particularly "difficult". 😏
Re-sanded with the R.O.S and 150 grit disc. Found another spot in the stern where the hull & deck separated. Also confirmed disintegration of the rear hatch lip. I think it may be that the junky ply I'm using has too many voids.
I masked the sheerline with duct tape, and fiberglassed the hull. It was a fairly routine job, with the typical Stress & Mess. I added two layers of 4 oz. reinforcement at the bow & stern spots most likely to be scuffed.
Back to the deck. I decided to add a thin disc of plain veneer 1/2" wider than the onlay to hide my original routing mistakes. here it is, taped and stretch-wrapped down. I also held it down with foam blocks and more stretch wrap.
Some epoxy seemed to soak through the maple veneer (possibly a good thing), but a little light scraping took care of it. It seems like a thick buildup, but I think I can deal with it.
New hatch rim in place. I tried fiberglassing the rim & spacer, but it made the parts too stiff, so there are just generously slathered in epoxy. I haven't positively determined how the water gets into these yet, so I'm going to try 2 oz. fiberglass where the spacer meets the deck.
After coatings and sandings, these look pretty good. I hope/think that the fiberglass acts as a "medium" for the epoxy, insuring that no wood can be exposed.


No comments:
Post a Comment