Tuesday, June 25, 2013

Ram Island Again

I seem to have a Yearly Pattern: build a kayak in the winter, and do every paddle that I did last year again, in the new Kayak.
So having taken up a new the new hobby of geocaching during the winter, I use it for a reason to repeat my paddle routes of last year.
This time, I returned to Ram Island for a cache. The cache is placed on one of the small "extra" islands to the north of where the house is. I was pleased to see that the connecting sandbar was underwater at high tide, and The Mean Doggies did not appear.
I enjoyed the paddle, nonstop from Esker Pt. The OI sprinted across the busy channel nicely. Landing earned a few new scratches.

 Cache was an easy find. These two "little" islands don't seem so "little" when you're on them.

Saturday, June 1, 2013

Messerschmidt Pond

Today was my first real "shakedown cruise" of the Outer Island. Last Saturday, it was 50 degrees and drizzling rain. Today was 85,  sunny & breezy. Off to Messerschmidt Pond in Westbrook.
A typical small Connecticut lake. Not much to distinguish it from Rogers or Cedar-water lilies,  a few small put-ins, weedy shallows, and an island.
The boat seemed speedy.  My GPS showed a top speed of over 6 mph, and easy cruising at 4.    
I paid especial  attention to the tracking. I found no bias to either side not having to do with the wind. I had been warned about "lee cocking", which I had taken to mean "turning away from the wind". It seemed more like the entire boat made leeway, a bit like a sailboat, but nothing that I couldn't compensate for. 
Did a nice cache on the island.
Also had a bit of the same phenomenon I used to experience when I skied-expecting to be just as good at the beginning of the season as I was at the end of last season. 

Saturday, May 25, 2013

Done!

I'm surprised at how much it looks like my old Shearwater.
I pushed myself hard to complete it by today. Weather forecast was not good. Turned out to be 50 degrees, light rain, but we went for it anyway.


Getting rained on


Obligatory "trophy" photo:

I had spent a lot of time & energy fretting about the seat, cockpit foot pegs, etc, but I felt immediately comfortable in it. It seems more nimble than I had expected it to be. I think that reducing the length while keeping the design  rocker measurements the same had the effect of "more rocker"-it seemed to turn more easily than Jay's. Its also fast, but in a different way than the Shearwater. It has a less-fine bow entry, and longer waterline length. It seems to "glide" further.


Friday, May 24, 2013

Outfitting

"The first 90% of the task takes the first 90% of the time. The last 10% of the task takes the next 90% of the time." That's how it went-when I thought I was close enough to the "home stretch", I started making blunders, like screwing up the holes for the foot braces.
 Those Old Ironsides toggles
The hatches don't seal quite as tightly as the last build's, because I used 1/4" ply instead  of 4mm.


The deck rigging was easy.


I decided to try these fancy-shmancy foot braces. I hope I like them, since they weigh a whopping 1 lb each.


 I shaved my old foam seat down a little, to fit the bottom of the cockpit, and actually managed to cover it in Spandex. Same old Rapid Pulse back band as the last build.


Monday, May 20, 2013

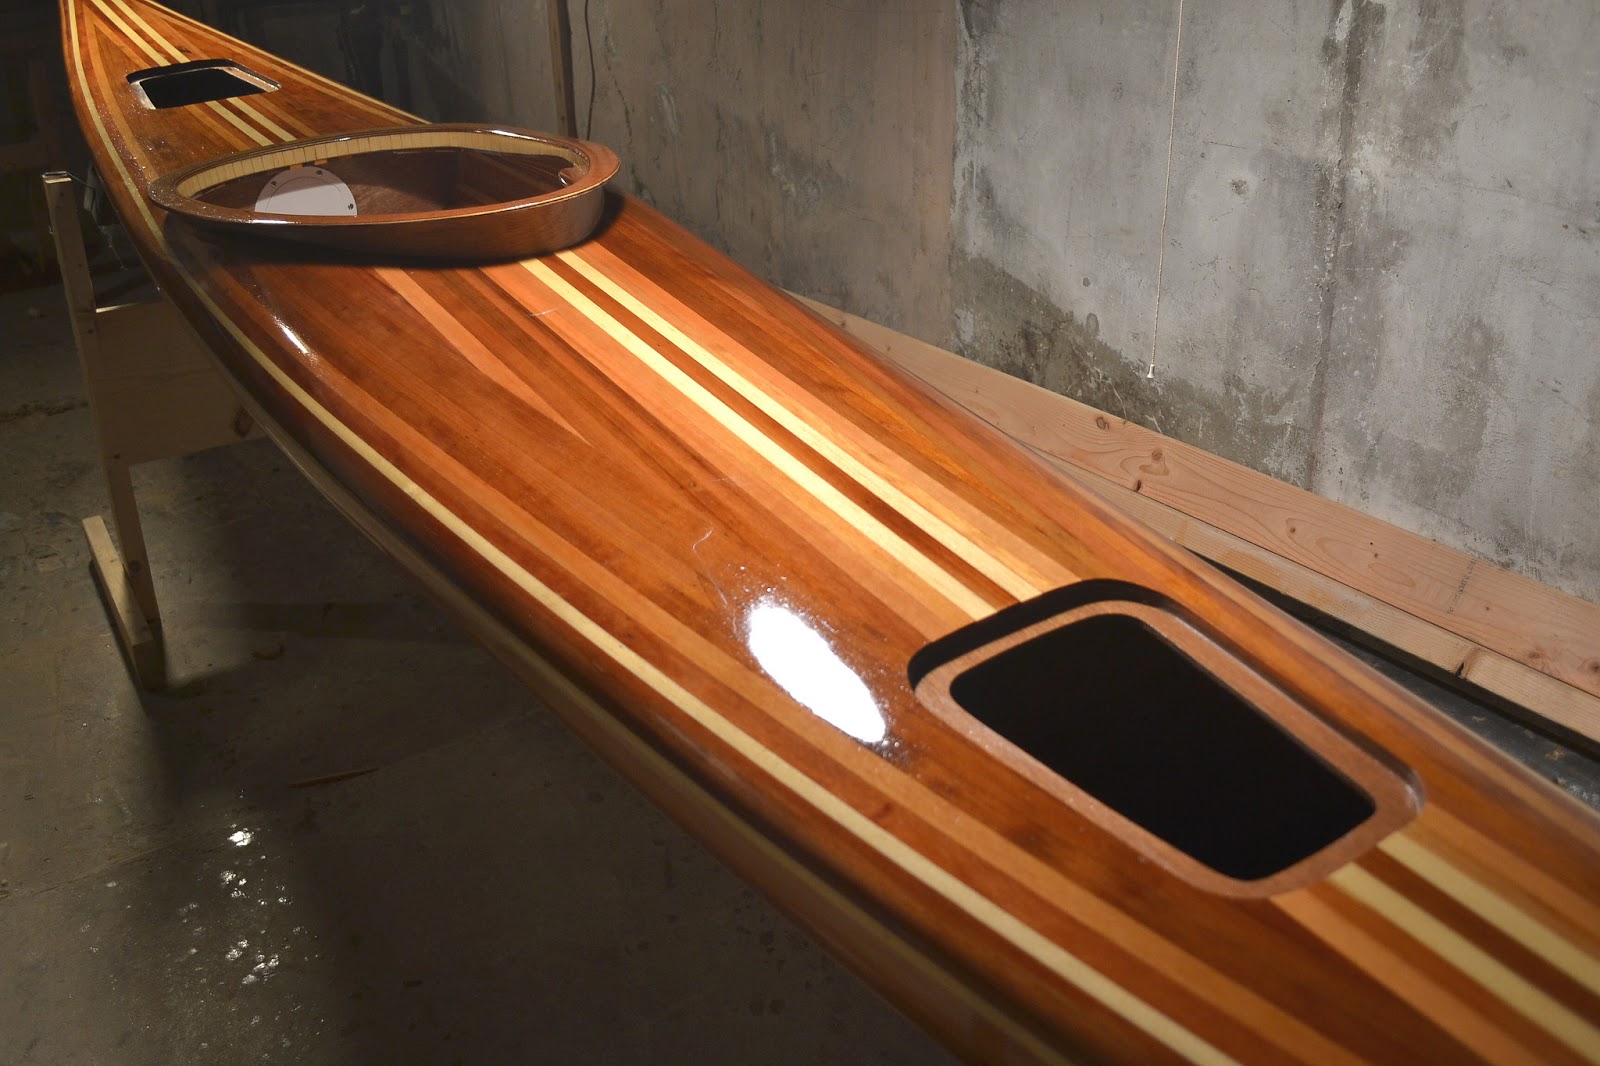
Varnishing

After the usual tedious job of cleaning the basement, I decided not to try anything new at this phase, and fall back on ways that worked in the past. I wet-sanded down to #400, and used Schooner Gold.
I'm starting to like it again.  

Sunday, May 19, 2013

A Stupa in Saybrook

One of the things I love about Geocaching is the way it show me nearby places I never knew about. 
This a nifty place. The sign says that it is preserved jointly through The Saybrook Land Trust, State of Connecticut, and Town of Old Saybrook. It appears to be an old farm, and still is, sort-of.
This thing stores "Farm Market" signs, near the small parking area. While we were applying anti-tick measures, a guy in a truck stopped by & was friendly. We think he is the "farmer.
A stroll down the road at the right showed interesting gardens. Most of the fencing, etc, appeared to be recycled materials, such as plumbing pipe. It had a friendly, funky feeling.
Hand-painted signs with friendly messages:

Further down the road, it gets really interesting. This is a building built of hay bales. It appears to be stuccoed-over. We pondered the building technique..
 The place had kind of an interesting take on private/public. It seemed that we could wander around what would "normally" be "off limits" freely, yet a few places were fenced. 
This was great. It  is an outhouse, but it took me a while to figure out the meaning of the sign. We figured that it meant that "guys", as in literally "men" should pee in the woods, and save the outhouse for Seated Use. :D
On through the woods to the cache. Very nice, well-cleared trails, and interesting trees.

The cache was nicely placed, overlooking a small, pretty lake that I never knew existed. We checked out the Stupa:
I couldn't seem to find a way to take a good photo of this. The field is foot-tall grass, dotted with buttercups and lilies, with a few paths mowed. It looks like a great place for something : Music Festival? Craft Show? 
Prayer flags:

Across the field, more evidence of Old Farm Homestead:
 
Interior:
Neat Day!
 

Sunday, May 12, 2013

Carrying Toggles Of Ancient Wood

My friend Bonnie and her husband once owned a woodworking factory in New Hampshire, which provided wood for one of the U.S.S. Constitution refits. In my previous build, I also made carrying toggles of wood which Bonnie claimed was "from the Constitution". It was Indian rosewood, which made me think that it was probably a scrap from a modern replacement part, rather than original wood. However, while cleaning out her house prior to moving, she found this venerable-looking timber and kindly gave it to me:
It definitely looks old. The hole on the top looks like it was drilled for a peg. There is a remnant of a copper nail. I started to get excited, thinking that it might have "monetary value", and did research. Some Dipstick On EBay had a similar piece, for which he was asking $10,000.
I took photos and sent a letter to the curator of The Constitution  Museum. He answered that it was:
1. Old
2. Oak
3. Very probably from a ship
4. Impossible to prove that it was from The Constitution, without Documentation, and
5. Of very little monetary value, even if it was.
I since learned that Constitution Wood, from the many refits, is not particularly rare. Guys used to have walking sticks made from it. The doors of the Customs House, here in new London, are made from it. Smaller scraps are sold in the Museum Gift Shop for $5.
In any case, I thought it would be a nifty piece to use. I made a turning blank:


Strange. This wood emitted an aroma when cut. I can only describe it as "oldness". I wonder if they treated it with something?
I like the way these came out!

Tuesday, May 7, 2013

Hatches

This went fairly routinely. I had the pages from the manual copied at the recommended sizes. I found that the sill size gave a rather small lip for the gasket, and I like to use a full 3/4" piece of weatherstrip, so I made the sills wider.


Cutting The holes went fairly easily. 
CLC advocates laying up the spacers and sill all at once, making a gooey mess that will have to be chiseled & sanded. Instead, I glued the spacer on first, then the sill. 

This was much easier to clean up.

The last job of woodworking was the thigh braces. That too, went easily. 

Wednesday, May 1, 2013

Cockpit Coaming & Riser


I had a feeling that I'd make myself a lot of work by raising the foredeck, and I sure did.
On my previous builds, I raised the coaming by stacking up rings of plywood. after raising the foredeck 1", there was nearly a 2" difference in height between the front & back, when a straightedge is placed across the opening. I posted on the message board, and of course got plenty of suggestions. I decided to go for the Lots Of Tiny Pieces method.
I put coves & beads on some leftover pine strips. Somehow, this was easier than the last time I tried it. It must have been the router table setup.
I glued the pieces together with hot-melt glue. I'm kind of working backwards here: most make a very neat cockpit opening, then build the riser around it. I made a very neat lip ring, and I'm building the riser around it.
Second row, glued to the first. Already scrounging for clamps.
I thought the setup might look ugly, so I made a strip of white oak to go around the outside. Tried steam-bending it (disaster), but managed to laminate it on with the heat gun & epoxy.
Coping the bottom to fit the deck was very tedious. I discovered that one side of the opening was higher than the other, and had to use major clamp pressure to get it level. I made a fillet of dookie around the outside.
Showing the height difference. I couldn't see building it up with 8 plywood rings, or 20 layers of fiberglass cloth!
Fiberglassed, by the usual technique, and the usual sanding. Very pleased that my old spray skirt fits.

Saturday, April 20, 2013

Rattlesnake Mountain & Hospital Rock

Rattlesnake Mountain is yet another steep trap rock ridge, part of the Metacomet range that includes The Hanging Hills and Mt. Higby.  After reading about it on the CtMuseumquest web page, I went looking for Hospital rock. Very fortunately, someone has placed a cache near the rock, providing coordinates.
Parked on Metacomet Road, after passing many "No Parking" signs, at what seemed like a safe spot. The trail head leads to this remnant of a road:
 Very eroded & steep,it climbs the full height of Rattlesnake Mountain in a few hundred yards.
GPS brought me over a few dirt roads to the cache, which was only a few yards from Hospital Rock. The Rock is much more subtle that I'd expected. Somehow I was expecting a wide-open area on a prominence, but its in a flat, wooded area. One could walk right over it without noticing. The carvings themselves are very faint. You can highlight them  by brushing them with flour, and if someone hadn't done this recently, I wouldn't have noticed them at all. I brought my own flour & brush, and dusted until I ran out of flour.


 And the Neatest Carving Award goes to:

 Back to the trail for another cache, this one near one of those old Nike Missile sites. The Trail goes right over it. 
Lots of rusted fencing about.
And a nice view of a toney neighborhood:


Saturday, April 6, 2013

Glassing The Deck

Even the parts of the project that I expect to go "routinely", sometimes have problems. They must be "routine" problems.
I got a few ripples. One day, I will figure out what exactly causes this.
Jay's building manual advocates glassing all parts, then glassing in a strip on the outside. Instead, I left the top of the deck un-glassed, and masked an overhand, as on my last two builds. My choice of masking tape (filament) was slightly better than the last time, but this time I had to pull off left-over filaments.
 

Wednesday, March 27, 2013

Closing The Clam

This was a bit more tedious than expected.
I had considered cutting strips of 4 ounce fiberglass, but broke down and got a roll of 9 ounce tape. Here its tacked to the inside hull with hot-melt glue.

 The deck is still unglassed. Some epoxy did come through the deck, but I think I can deal with it.
It was hard to get the deck & hull to match up. Pushing the hull up to the deck was much easier than trying to pull the hull out to meet the deck. I posted a "help" message on the ConYak Builder's Forum. I mainly got a lot of complicated suggestions, but one worked: I made a 2x6" strip of aluminum (roof flashing) with a 90 degree bend at the end. I slid it into the gap, and pulled out on the hull while taping the halves together.
 My Thule racks have been pressed into service to hold the boat on end. I have the famous Brush On A Stick attached to a long stick. This would have been much easier to reach if the hatches were cut, but I want to glass the entire deck before cutting hatches.
I had almost forgotten how greedily 9 ounce tape drinks epoxy. I also found that the size of the brush wouldn't allow me to spread the epoxy to the bitter ends of the bow & stern, but I think I can reach it later, once the hatches are cut. 
After getting halfway through, I realized that I'd forgotten about gluing the the deck down at the tips. I rushed to un-tape the ends together, and woked some glue into the gap with a brush. A "whew" moment.